Engipedia Topo Shaper, Revit® Add-in

Overview
The Engipedia Topo Shaper tool enables users to manipulate topography instances using model lines in Autodesk® Revit®. This tool adds additional topography points along selected model lines, allowing for precise topographical modifications. Line division can be based on either the number of points or the distance between points. If multiple topography instances exist, the tool will prompt the user to select only one.
Download
The tool is available for download on the Autodesk® App Store
Supported Model Lines
The tool supports all model line types, including lines, arcs, ellipses, curves, and NURBS. Please ensure that selected model lines are not closed loops; the tool will provide a warning and ignore them. If you wish to use closed loops (such as circles or ellipses), they should be split into two or more segments using Revit®’s Split Element tool.
Point Distribution Considerations
Topography is represented as a mesh object, so the division of points must be approached thoughtfully. More points do not necessarily yield better results.
Saving Current Topography
A key feature of the tool is the ability to save the current state of the topography. The state can be saved as a CSV points file, allowing users to revert to the original topography later using Revit®’s Massing & Site > Toposurface > Create from Import > Specify Points File tool. Please note that saved topography points will always be in meters.
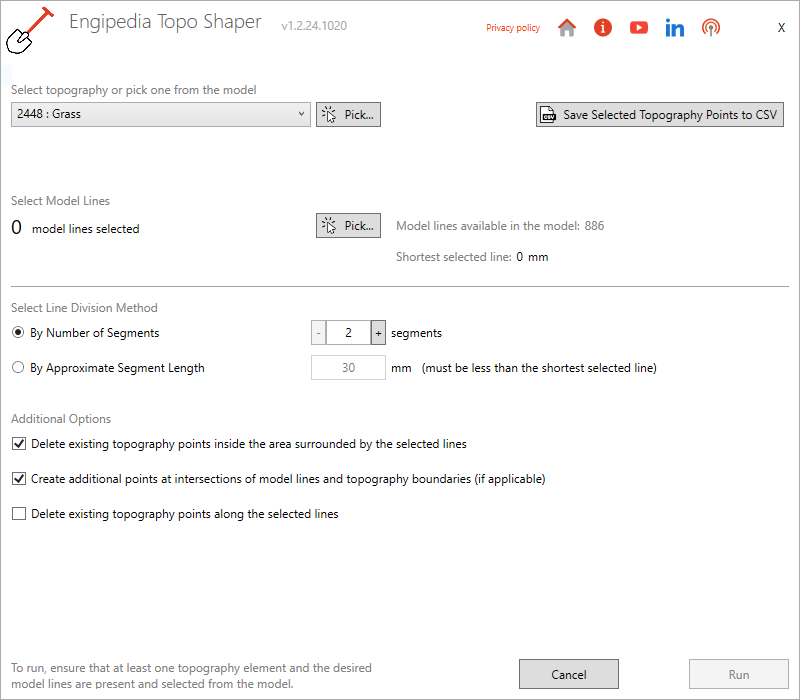
User Interface
The Engipedia Topo Shaper tool can be found under the Add-Ins tab in the Revit® ribbon.

The user interface of the tool:
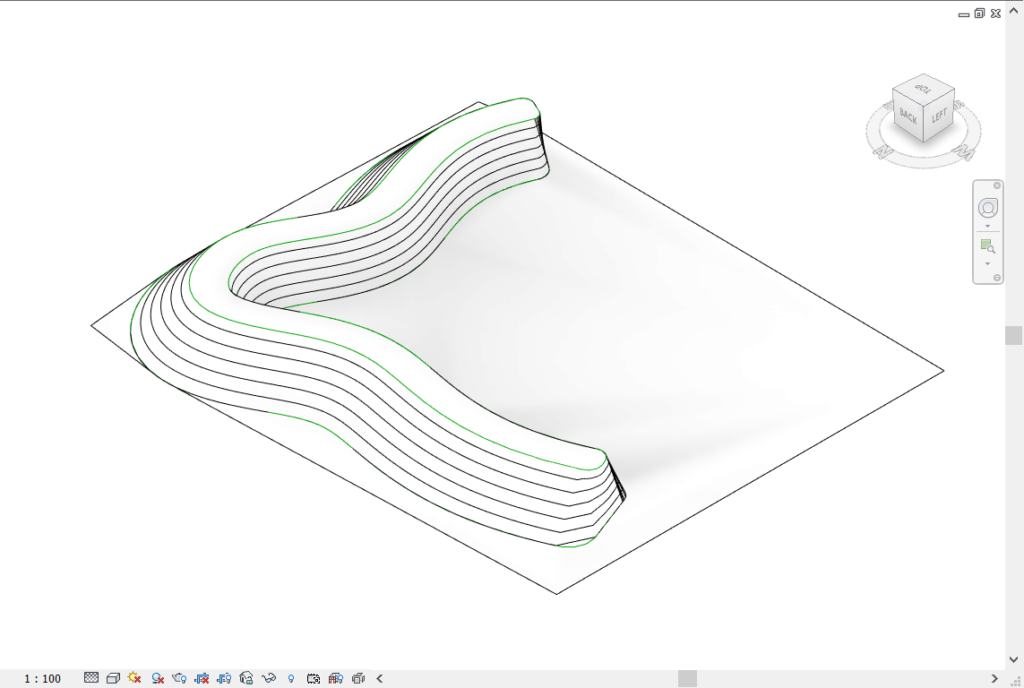
Example Workflow
Here’s a simple example illustrating how the tool functions with topography and multiple instances of model curves, lines, and arcs:
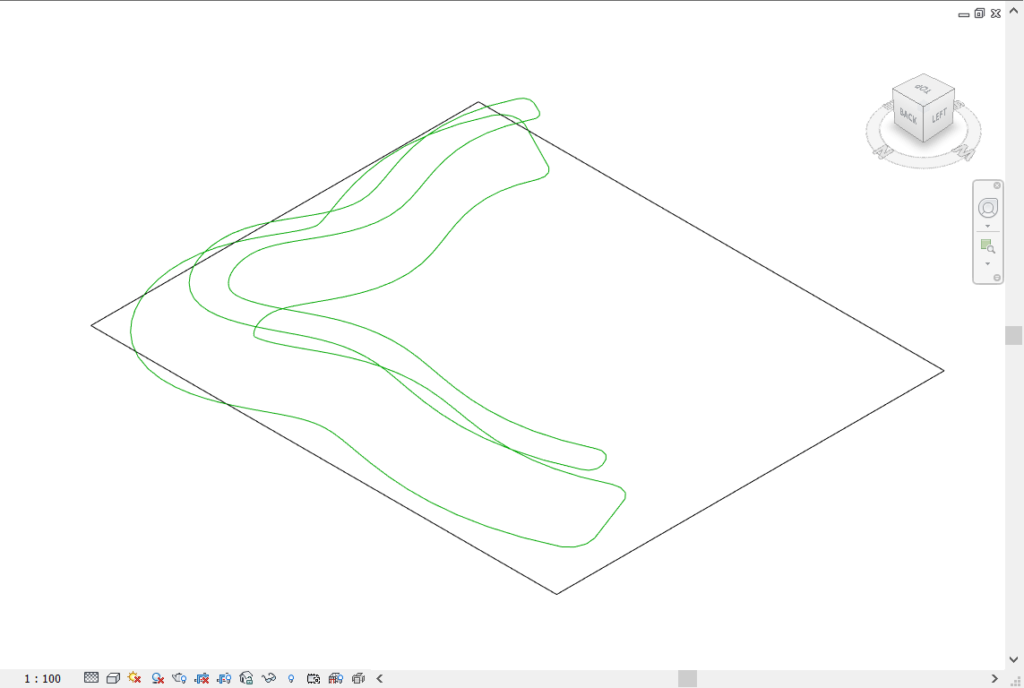
When user runs the tool the following will happen:
- Topography Instance Selection: If multiple topography instances are present, the tool prompts the user to select one to modify. If only one instance exists, the tool automatically selects it.
- Model Line Selection: Users are prompted to select one or more model lines to modify the topography. These model lines must be bound (i.e., not closed loops). If no lines are selected or if all selected instances are unbounded, the tool will exit. Any unbounded model lines among the selected ones will be ignored. To use unbounded model lines (such as circles or ellipses), users should split them into two or more elements using the Revit® split tool.
- Division Method Selection: Once the model lines are successfully selected, the main tool window appears. Users can choose to divide points based on either the number of points per line or the distance between points. The number of divisions must fall within the range of 2 to 999; otherwise, the tool will set an appropriate default. The distance between points must be greater than zero and less than the shortest line length among the selected lines. The tool will suggest the shortest distance, and any user input exceeding this will be ignored. The distance units will match those of the model.
- State Saving: Users have the option to save the current (unchanged) topography for future reference. The tool will create a timestamped CSV file, which is saved in the same directory as the model. All point coordinates are recorded in meters.
- Shaping Topography: By clicking the Shape Topography button, users can modify the selected topography by adding additional topography points along the selected model lines.
Important Notes
- The tool does not retain information about which model lines were previously used, allowing users to select them again if desired (including the option to add more points).
- Neither the tool nor Revit® will generate points with identical XY coordinates but different Z coordinates.
- The tool is not limited by the boundaries of the topography; it will add points even if the model lines extend beyond the toposurface limits.
Version History
v1.2.25.0706 – Added support for Revit 2026, introduces minor user interface improvements, and includes a new dialog for selecting the save location when exporting Revit topography points to CSV.
v1.2.24.1020 – This version is compatible with Revit 2015 to 2025 and supports editing of both Topography Surface and Toposolid elements.
Download
The tool is available for download on the Autodesk® App Store
Hello,
we have installed your plugin which is present in the Revit ribbon 2019, but when selecting the model lines the main window of the tool is not displayed.
cordially
Eric
Hi, have you clicked on the “Finish Button” in Revit Options bar (below the ribbon)?
Model lines must be selected first (multiple selection is set by the default). Then “Finish” button must be clicked to finish the selection, and after that the add-in will show. If you make “wrong” selection, you’ll need to exit the add-in and run it again (it will start from the selection again).
I will update this article to make it more clear. Still haven’t got the time to record simple video to show how to use it.
“A Point is outside of the Surface boundary. Insert the Point on the boundary instead, and then drag it to the desired location.”
Hi
I got above error message while working on you tool.
what is the meaning of this and what is the resolution?
Regards,
Adeel
Hi! Thank you for your comment.
We are not talking here about an error in tool, it’s Revit workflow issue.
You have more than one topography surfaces in your model. The line, you are trying to shape a topography with, is outside it’s bounds. Move the line (or make it shorter) to be inside the bounds of your topography (when looking from top/bottom view).
Lines can be outside the bounds of your topography only if there is one topography instance in your model or your topo instance is not surrounded with another topo instance. Otherwise, make sure your lines are inside the topography bounds in plan view, simple test: click on inner topo > Edit Surface, try adding additional topo points outside your inner topo surface manually – Revit will not let you.
I have installed your Topo shaper plugin for Revit 2022 but the plugin icon is not appearing under “add-ins”. I have tried to uninstall and reinstall, closing and opening revit but without any luck.
Hi, I don’t know what may be the trouble, are you sure you installed version for 2022? This link here: https://marketplace.autodesk.com/apps/ec3fa219-e805-40a8-a04d-2ae9ee083f16
Because, on my side, everything works fine:

Will there be a RVT23 Version?
Yes, Revit 2023 and Revit 2024 versions are available on Autodesk App Store
I can not get the tool to recognize toposolids in Revit 2024.
Currently, the tool only works with topography and does not support topographic solid (toposolid).
en revit 2024, no reconoce el sólido topográfico
Currently, the tool only works with topography and does not support topographic solid (toposolid).Actualmente, la herramienta solo funciona con topografía y no soporta el sólido topográfico (toposolid).
Please tell me you are working on a topo surface shaper for Revit 2026. Thanks.
Add-in version that also supports Revit 2026 was published on 2025-07-16 on Autodesk App Store. https://marketplace.autodesk.com/apps/ec3fa219-e805-40a8-a04d-2ae9ee083f16