Revit® Line Weights
In general, Revit lines are made out of three elements (parameters):
- Line Color
- Line Width
- Line Pattern
When we talk about “lines”, we mean Revit lines in general: e.g. drawing lines, and lines (edges) of Revit’s objects (edges and other lines in Revit family instances), which we can see in plan views, sections and Revit other views.
Color of the line is self explanatory. Now, let’s talk some more on the Revit Line Weights.
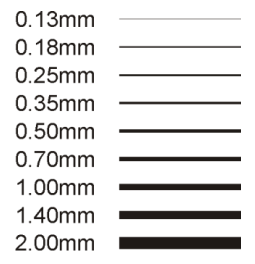
According to ISO/DIN Standard, basic (standard) line weights are
next:
 ISO/DIN lineweight color coding system for CAD
0.09mm Cyan
0.13mm Magenta
0.18mm Red
0.25mm White
0.35mm Yellow
0.50mm Brown
0.70mm Blue
1.00mm Orange
1.40mm Green
2.00mm Grey
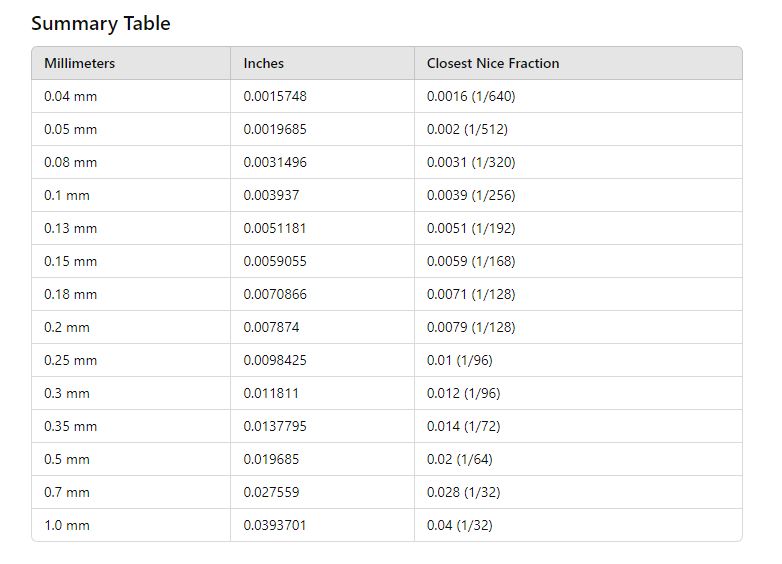
Line weights according to ISO are dependant on 1mm multiplied by square root of 2 (or divided by square root of 2).
For example: 1/sqrt(2) = 0,70 or 0,13 * sqrt(2) = 0,18 etc.
In that way we can extrapolate all of the standardized line weights. However, in Revit, we often use all of these and few more levels of line weights.
In Revit, line weight must be adjusted in project (or template) file. Difference between Revit and AutoCAD is that in Revit we have all of the print styles adjusted upfront. In AutoCAD, we usually choose Plot Style when we print our model (among other ways, of course). Revit works as WYSIWYG (What You See Is What You Get), so, if we take a look at some Revit view, what we see is what will be printed. Just to be precise, Revit has the, so called, Thin Lines view style, which displays pure vector drawings (without line weights). Revit will not print in Thin Lines, but in the “real” line weight of each line.
We can adjust Revit line weight if we first go to the Manage tab on the ribbon, then, under Additional Settings, we choose ![]() Line Weights:
Line Weights:
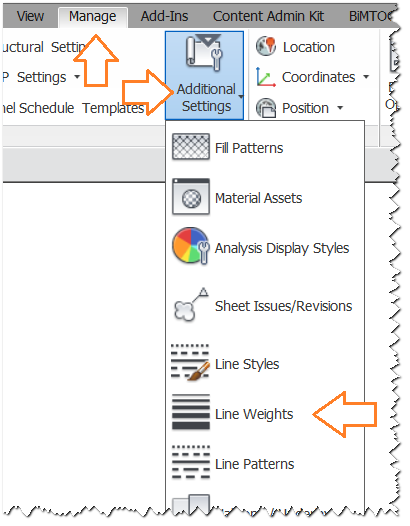
Dialog opens, and it has three tabs: Model Line Weights, Perspective Line Weights and Annotation Line Weights. On each of the tabs, we can see a table of 16 rows with successive numbers 1 to 16. These numbers are called Revit PENS. It is not possible to add additional pens (or to remove existing pens).
Model Line Weights
The biggest table on the dialog defines line weights for the model elements. These line weights are applied to all of the views dependant on the scale (3D, Floor Plans, Ceiling Plans, Structural Plans, Elevations, Detail Views, Sections). Table has 16 rows and 6 basic columns. In the column header we can see the scale on which line weights from that column will be used. It is possible to add additional scales. If there is a scale in the view which have no line weights defined for that scale, a line weights for the closest scale will be used.
This is very practical because it ensures that our views will look great on each scale. Ok, at least we hope it will.
Autodesk® Revit Default Line Weights
Before continuing, let me share my opinion about Revit default Line Weights.
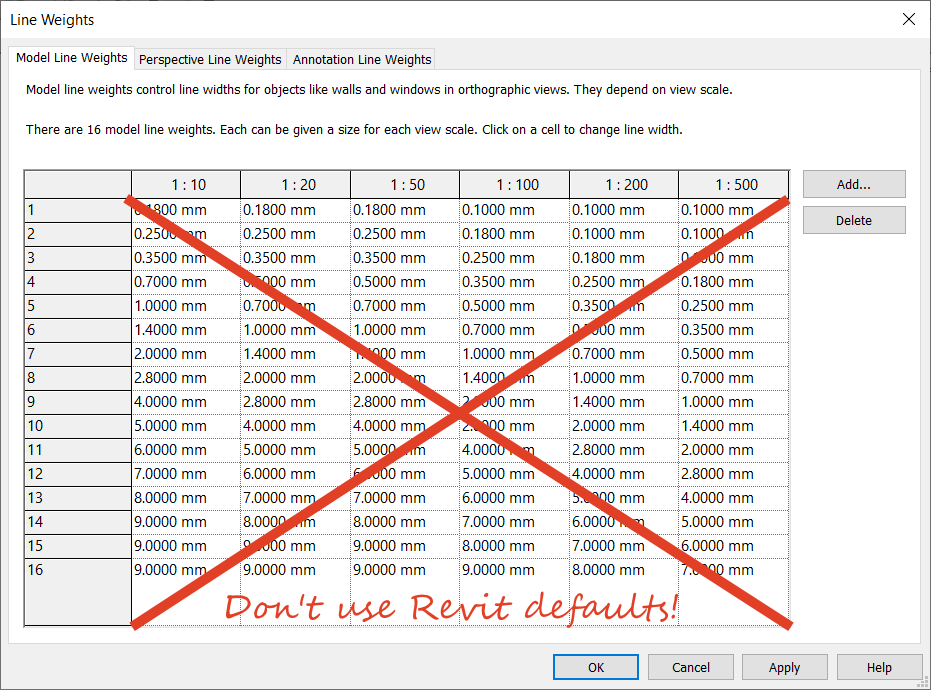
As you can see on the table, it goes up to 9mm.
9mm?! Have you ever in your professional life stop and thought: “hm, this should be at least 9mm wide line, it would make nice technical drawing”?
Logic is simple, if you need wider line, you can always do it with several lines or solid fill hatch, but when you need something thin, there is no way to get it.
Also, many Revit professionals suggest that you do not change your line weights between scales. The other thing is, default table uses Pens 1 and 2, which are reserved (read below for more info) and wastes Pens 6 to 16 in scale on 1:10 on nothing. This can make a good challenge: use Autodesk® Revit® default line weights and draw a detail in 1:10 scale with 0.100mm wide lines.
To conclude: Don’t use it, change it!
Engipedia Revit® Standard Line Weights
Example: If we use pen settings from the table below, we can see that Pen 13 has line weight of 0,350mm in the 1:100 scale, but, in the bigger scale, for instance: 1:500, the same pen (Pen 13) will be only 0,250mm wide. (edited 2019-11-10): system was revised based on latest practice. There is no longer change in line weights from 1:100 to 1:10 scales since there is no real benefit in it.
If we use ISO standard line weights, and interpolate some more to it (AutoCAD print plot style compatibilty reasons), recommended (Engipedia Revit Standard) Model Line Weights settings in Revit will look as follows:
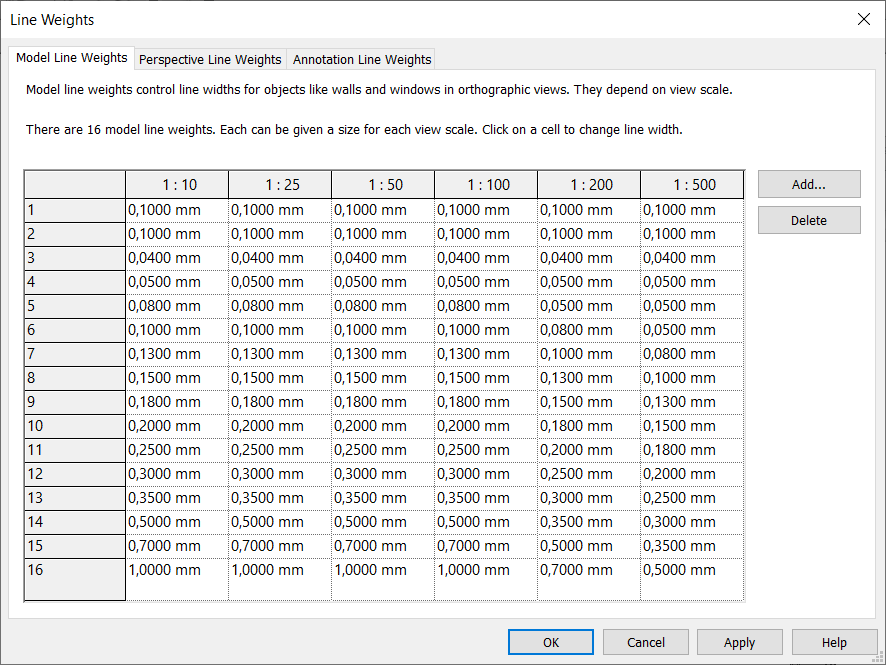
Perspective Line Weights and Annotation Line Weights have the same line weights as in 1:100 column of Model Line Weights.
We can easily adjust the table to our needs by clicking into each cell and enter the number we need (in milimeters). Once we develop Revit Pen standard, I recommend not to change it later (it will mess up ALL object styles in the model). I use comma instead of decimal point, how? Read here.
Remark: First row of the Model Line Weights table (widths of the Pen #1) is used (reserved) for Revit hatches (Revit filled regions). Ceiling surface patterns use Pen #2. So, if you want to control those independently, you should start your regular line weights from Pen #3. It is not recommend to use pen 1 and pen 2 for anything (else) in the project.
Tip: If we adjust line weights in one project file (or in a template file) we can easily transfer those settings (line weights) to another project with Transfer Project Standards tool on the Manage tab.
Perspective Line Weights
These line weights are used in the 3D perspective views. It has only one column (and no scale at the column header) because Revit perspective view is not scale dependant. Remark: “regular” axonometric 3D view is scale dependant and it uses Model Line Weights (those from the big table).
Annotation Line Weights
These line weights are used for all of the annotation elements (Element tags, Dimension lines, Elevation tags etc.). It has only one column (and no scale at the column header) because Revit annotation elements are not scale dependent. For example, dimensions line weight must look the same on every scale.
To conclude: if we find somewhere in Revit line weight set to 3 (for example), then:
- If it is an annotation element, we take a look at the Annotation Line Weights table to find out it’s weight.
- If it is not an annotation element, we take a look at the Model Line Weights table to find out line weight for particular scale and
- into Perspective Line Weights table to find out line weight for that element in perspective view.
Read more: REVIT LINE PATTERNS, REVIT LINE STYLES
Pingback: Revit Line Styles - Engipedia.com
Pingback: Revit Line Patterns - engipedia
In the engipedia line weight settings that you posted, 1,2 and 6 have the same line weight of 0.1. Also line weight of 1 is thicker than 3. are you sure this is correct?
Yes, it is correct, and in the post I explained why.
Can you share your object style lineweight settings that go along these lineweights?
Can you explain why you transform the ISO 0.09 to 0.1? You mention Autocad Plot compatibility issues, can you explain that? Also, 0.04 looks very thin, will Revit and the printer be able to handle this? I thought Revit had a minimum thickness possible (https://revit.miraheze.org/wiki/Line_Weights)
Hi, to be honest, I don’t remember why I used 0.1 mm instead of 0.09 mm, I wrote this 9 years ago (2015-04-27). I believe I wanted to round it up so it’s easier to type. Maybe because of the special uses for the first two pens. But, looking at it now, it seems it should be 0.09 mm to your point.
Per Autodesk, the thinnest lines possible in Revit are 0.003″ (or 0.075 mm) but I can’t find the data if it’s for the screen or also for the printer. I don’t know if Revit would print 0.04 mm, but Autodcad will (if you have such plotter).
Hello Mirko
This is a fascinating read. I am in the middle of revising our office Revit template and found this half-way useful.
I am saying that because we use the imperial scale and haven’t found a proper way to translate your post from metric to imperial.
Would it be too much to ask for a follow up to this post but for us poor souls still using the imperial scale?
Sincerely and thank you again,
Daniel
Hi, the best I can do is use chatGPT to help me translate and leave the rest to your judgment since you are surely better expert with the imperial unit thicknesses.
 .
.
I would appreciate if you would let me know what your final product is so I can improve the article.