Revit® Line Patterns
In general, Revit lines are made out of three elements (parameters):
- Line Color
- Line Width
- Line Pattern
When we talk about “lines”, we mean Revit lines in general: e.g. drawing lines, and lines (edges) of Revit’s objects (edges and other lines in Revit family instances), which we can see in plan views, sections and Revit other views.
Color of the line is self explanatory. Now, let’s talk some more on the Revit Line Patterns.
In Revit, line patterns can be adjusted in the project (or template) file. Revit has it’s line patterns adjusted directly in the model, not when you print it (e.g. there is no such thing as Line Type Scale or similar, like we have in AutoCAD). Revit works on the WYSIWYG system (What You See Is What You Get), hence, the way we see some view (it’s line weights, colors, line patterns, hatches etc.) is exactly how it will look if we print it (with few minor exceptions). In Revit, line patterns can be adjusted within “Line Patterns” dialog.
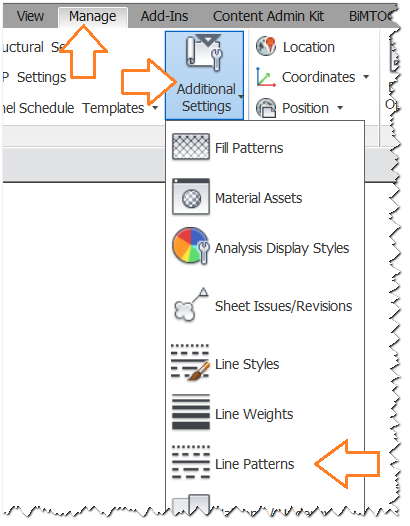
To run “Line Patterns” dialog, we go to the Manage tab on the Revit ribbon, then, Additional Settings and then, from the drop down menu, we choose command ![]() Line Patterns:
Line Patterns:
“Line Patterns” dialog opens. Now we can see all of the line patterns defined in Revit model (Revit project or template file):
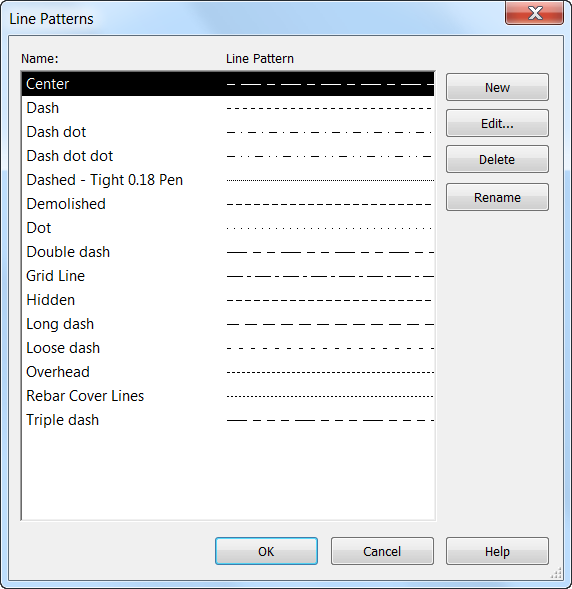
Line Patterns dialog contains two columns, name of the pattern (column Name:) and preview of the line pattern (column Line Pattern). Existing line patterns can be deleted if we click on the row of the particular line pattern and then choose Delete button on the right side of the dialog.
Be very careful if you want to delete defined line pattern because when you delete a line pattern, which is already used with the object and line styles, you will reset style of all elements that were using that line pattern (and Revit will not tell you which elements are using that particular pattern in it’s line object style).
The Rename button is used to change the name of the already defined line pattern (it’s self explanatory). This is very useful if we want to change the name later to keep the consistency of the naming conventions, or to differentiate line patterns for different uses.
The New button is used to create a new Revit line pattern. When we click on the New (line pattern) button, Revit Line Pattern Properties window opens:
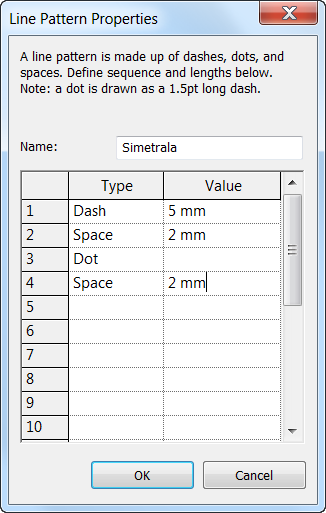
On the top of the dialog, we can see a short instruction: “A line pattern is made up of dashes, dots, and spaces. Define sequence and lengths below. Note: a dot is drawn as a 1.5pt long dash“.
So, line pattern is consistent of dashes, dots and spaces. To successfully define line pattern, one needs to define logical order of pattern elements and their lengths. There are few rules to follow:
- Space must come after each pattern element (dash or dot).
- Line pattern cannot begin with space.
- Line pattern must end with space.
- Dot will be displayed (and printed) as a short line (1.5 points wide).
Minimum length of an element must be at least 0.5292mm (or 1/48 inch).
Smallest line patterns which can be created in Revit must have (at least) one dash and one space (dashed line), or, of (at least) one dot and one space (dotted line).
Longest pattern can have total of 20 elements.
Once defined, line pattern can always be renamed and/or changed by clicking on the Edit… button. Revit Line Pattern Properties window will open. The same thing happens if we click on the Rename button.
Unfortunately, there is no “Duplicate” button. This could be useful sometimes.
Of course, by clicking on the OK button, we confirm the pattern, and it is now saved in the project file. Our new line pattern is ready to use.
Tip: It is very practical to make purpose of the pattern one of the first blocks in the line pattern name. E.g. if the particular line pattern will be used for section line style, that line pattern name should look something like: “[first name block]-SECTIONS-[other name blocks]”. Of course, that line style should be used only in Section Object Style.
I will talk some more about other name blocks and other tips and trick in future posts.
Also, if we use the same line pattern structure for the Section symbol line and for the (e.g.) Level line, it is a good practice to create separate line pattern for each purpose. In that way we will have two line patterns (of the same structure) with the names:
- [first name block]-SECTIONS-[other name blocks]
- [first name block]-LEVELS-[other name blocks]
In this way, we are safe to change any of those two line patterns without fear that our change will effect some model elements we did not intend to change.
Also, one last remark: line pattern (like color for e.g.) does not have it’s own purpose. It is just a set of dashes, dots and spaces, saved under a unique name with a purpose to be used in (any) line style definition (for example, in the Object Styles dialog).
Read also: REVIT LINE WEIGHTS, REVIT LINE STYLES
Pingback: Revit Line Styles - Engipedia.com
Pingback: How to adjust Revit Section Line Style - engipedia
Revit has the most limited waste of line pattern options. Absolutely terrible!
Agree, but some situations can be covered with Repeating Detail tool.